# Apps Web UI Quickstart
Get started with Conclude Apps for issues and ticketing from our web-based UI
> Get started with Conclude Apps from the web-based UI. Use apps in Slack and Microsoft Teams for support tickets, issues, incidents, bug tracking and more.
Canonical HTML page: https://conclude.io/quickstart/dashboard/
Last updated: 2026-07-08
---
## Start here
In this guide we will cover:
* How to sign up for an account
* Getting started from our web UI
* Installing a Conclude app
* Configuring an app
* Creating your first ticket
* Concluding your first ticket
## Step 1: Sign up for an account
* Select **Sign up** at the top of this page to get started and follow the prompts to complete the authentication process
* If you see the user dashboard instead, it means that you have already added Conclude to your workspace (go to Step 2)
During authentication, you’ll be asked to grant permissions for the platform you’re connecting – Slack or Microsoft Teams. The screenshot shows the Slack consent user flow as an example. If you’re connecting Teams, you’ll see a similar prompt from Microsoft.
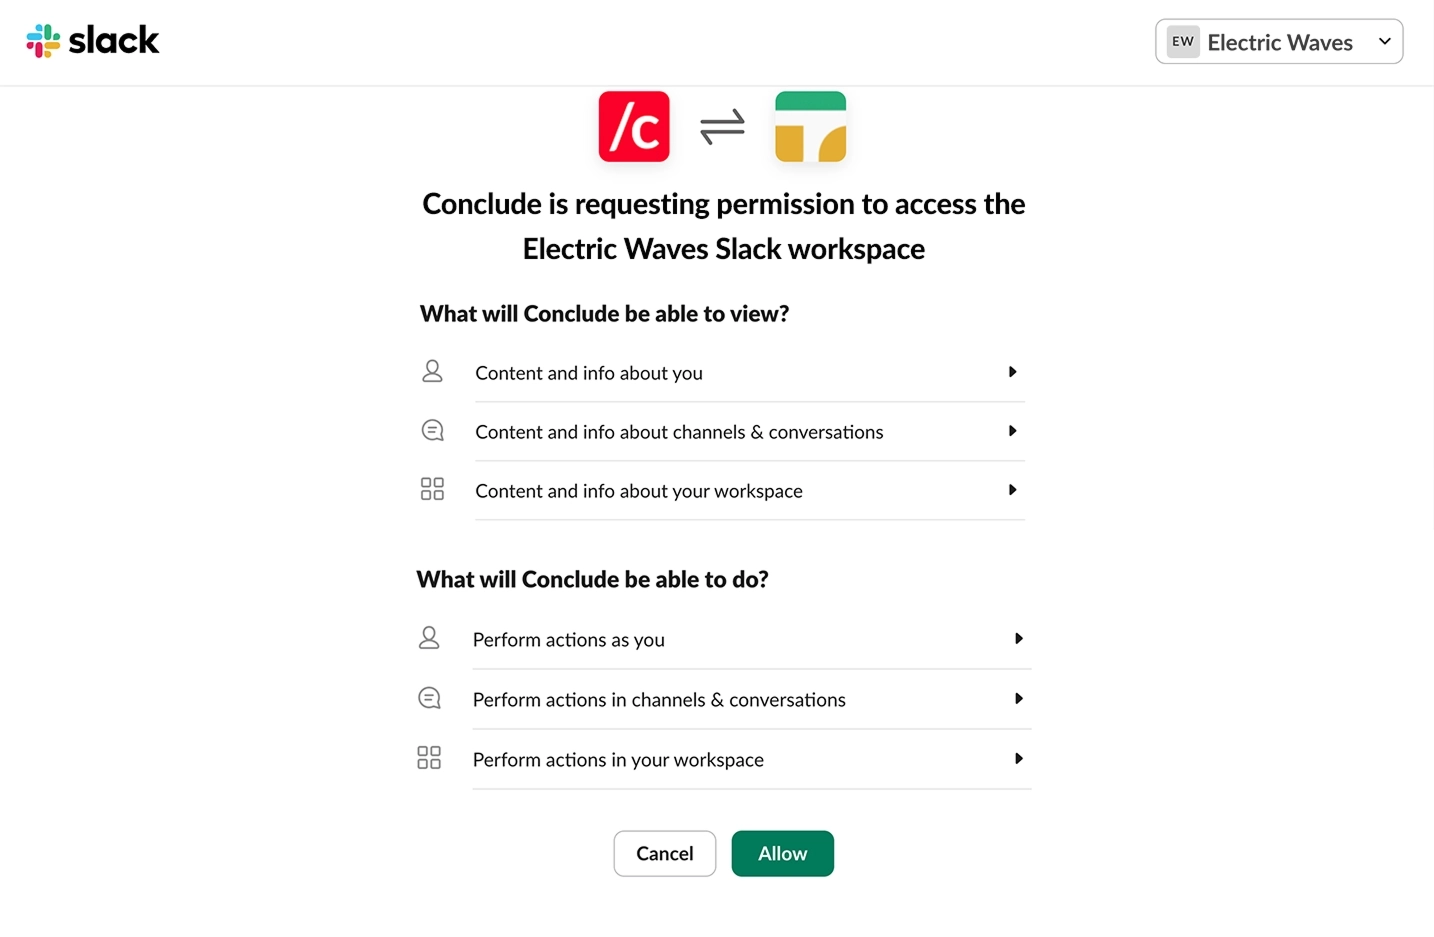 After clicking **Allow**, follow the prompts to set up an account for your organization. Once that’s done, you’ll be able to access Conclude's web-based UI.
## Step 2: Getting started from the web UI
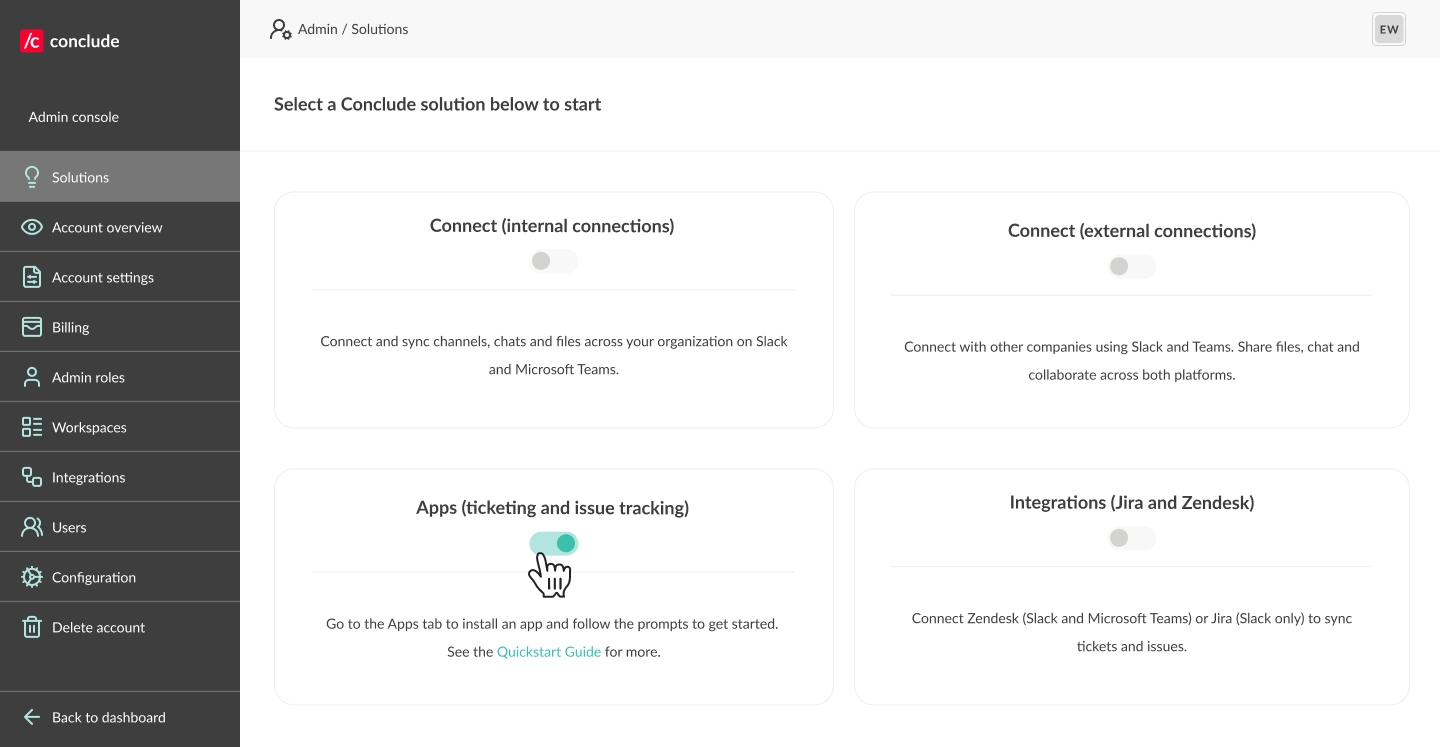
As an admin, you will see an overview of the Dashboard (available to all users) and can navigate to the **Admin console** located at the bottom left of the sidebar.
To activate Conclude solutions, click **Admin console > Solutions**. To enable **Apps (ticketing and issue tracking),** toggle the switch on.
After clicking **Allow**, follow the prompts to set up an account for your organization. Once that’s done, you’ll be able to access Conclude's web-based UI.
## Step 2: Getting started from the web UI
As an admin, you will see an overview of the Dashboard (available to all users) and can navigate to the **Admin console** located at the bottom left of the sidebar.
To activate Conclude solutions, click **Admin console > Solutions**. To enable **Apps (ticketing and issue tracking),** toggle the switch on.
 ## Step 3: Installing a Conclude app
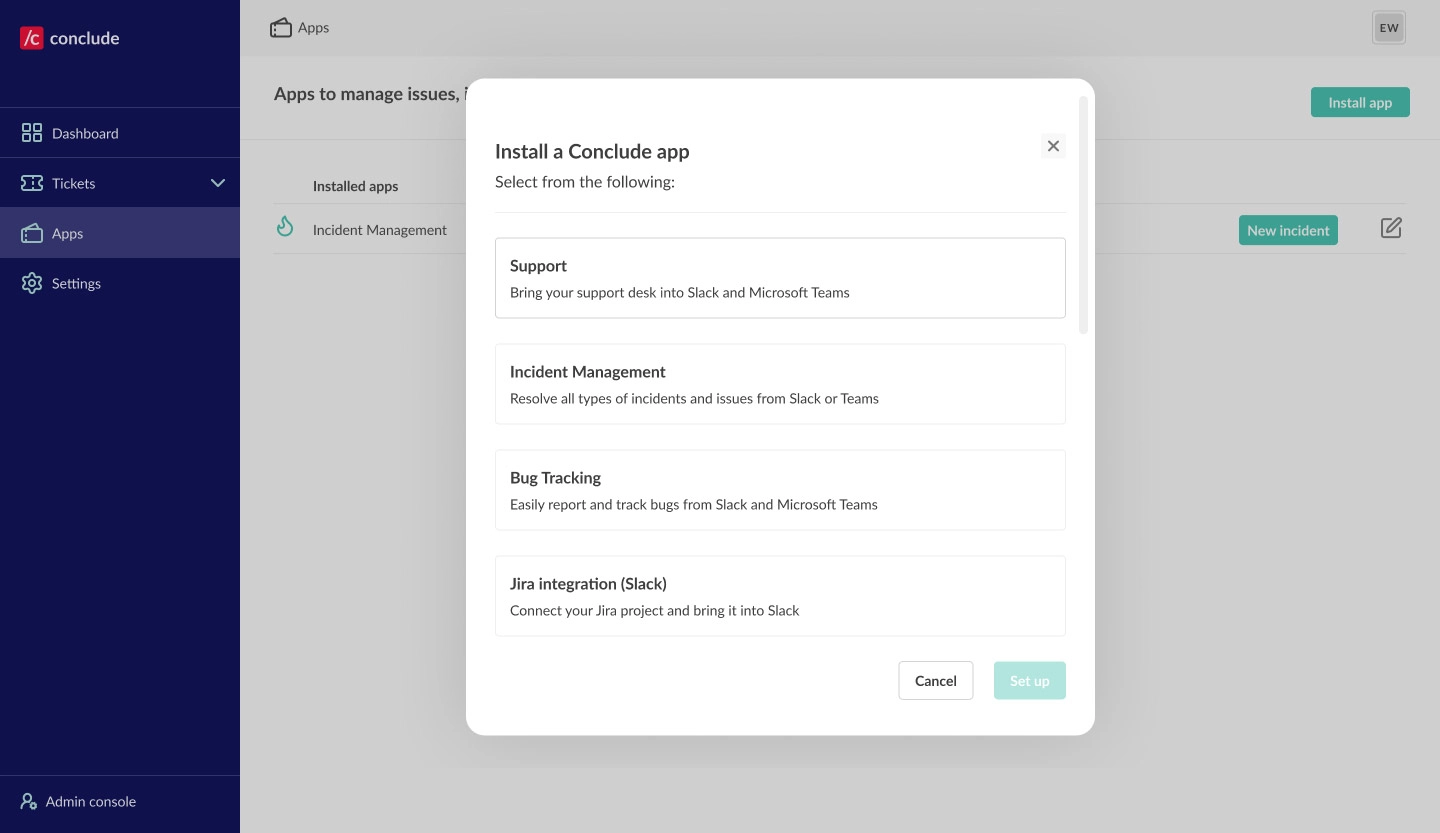
Once you have enabled **Apps (ticketing and issue tracking)** in Solutions, a new section called **Apps** will appear. Click **Back to dashboard** to navigate to this section. Next, click the **Install app** button in the upper-right corner.
Follow the prompts to install a new app (we are using the Incident template in this example) and click **Setup.**
## Step 3: Installing a Conclude app
Once you have enabled **Apps (ticketing and issue tracking)** in Solutions, a new section called **Apps** will appear. Click **Back to dashboard** to navigate to this section. Next, click the **Install app** button in the upper-right corner.
Follow the prompts to install a new app (we are using the Incident template in this example) and click **Setup.**
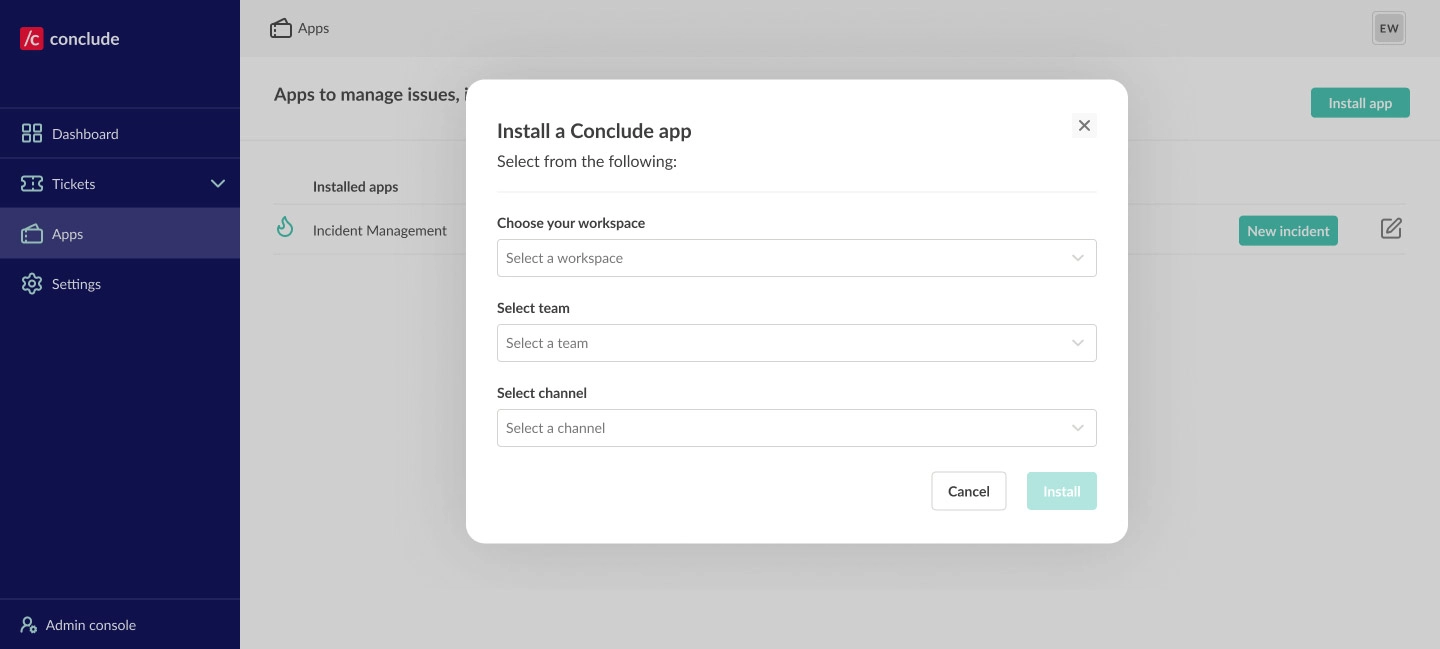
 To continue, select your workspace, choose a team, and then select a Slack or Microsoft Teams channel where you would like to install the app. Next, click **Install**. You can also create a new channel for testing purposes.
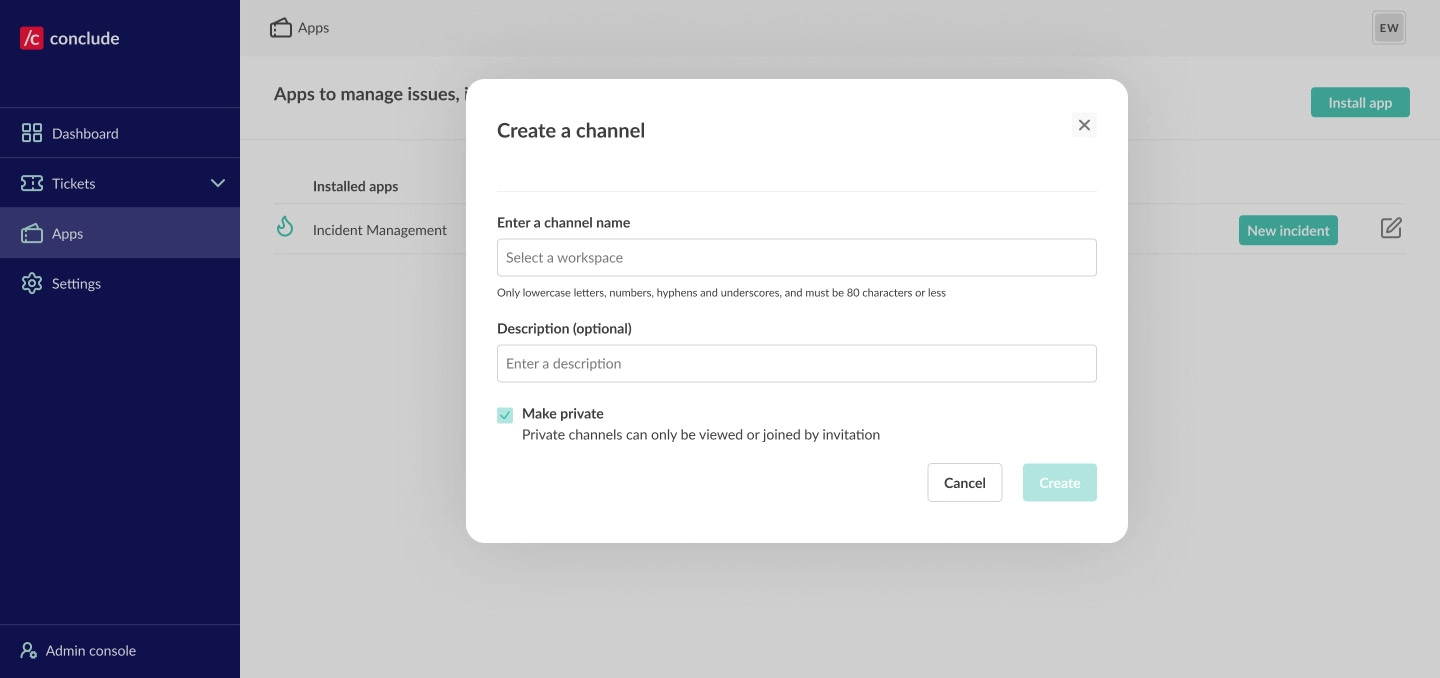
 If you create a new channel, you will be given the option to add extra details and make it private.
 ## Step 4: Configuring an app
Once installed, you can start to use the app straight away (go to Step 5), or you can customize it.
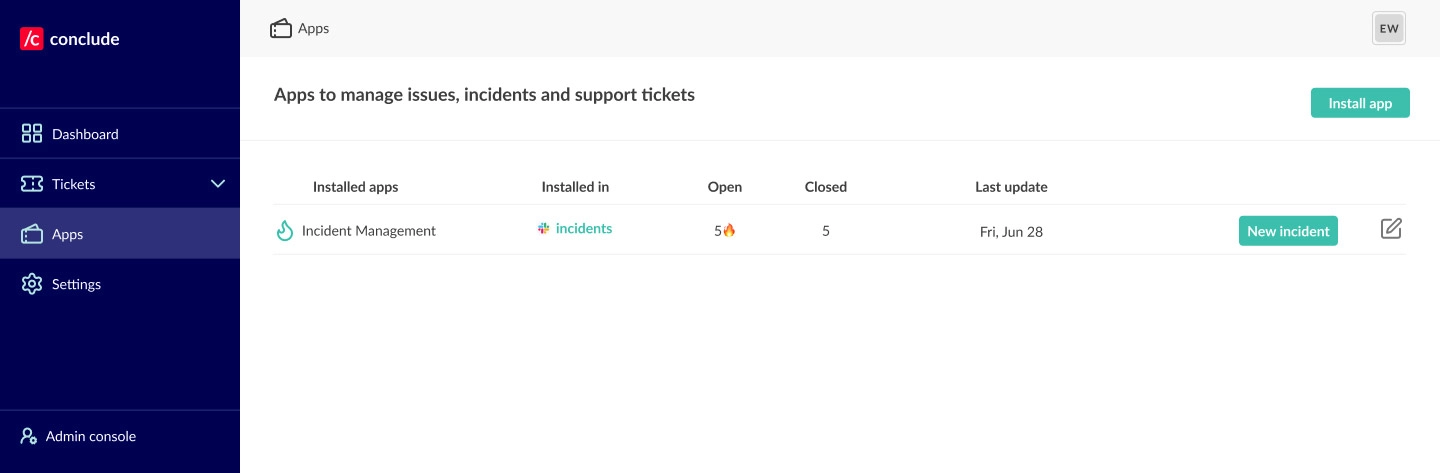
To edit your app, go to the **Apps** section of the sidebar and click the **Edit icon (pencil)** on the right, next to the app you want to configure.
## Step 4: Configuring an app
Once installed, you can start to use the app straight away (go to Step 5), or you can customize it.
To edit your app, go to the **Apps** section of the sidebar and click the **Edit icon (pencil)** on the right, next to the app you want to configure.
 This will open the Settings tab for the selected app.
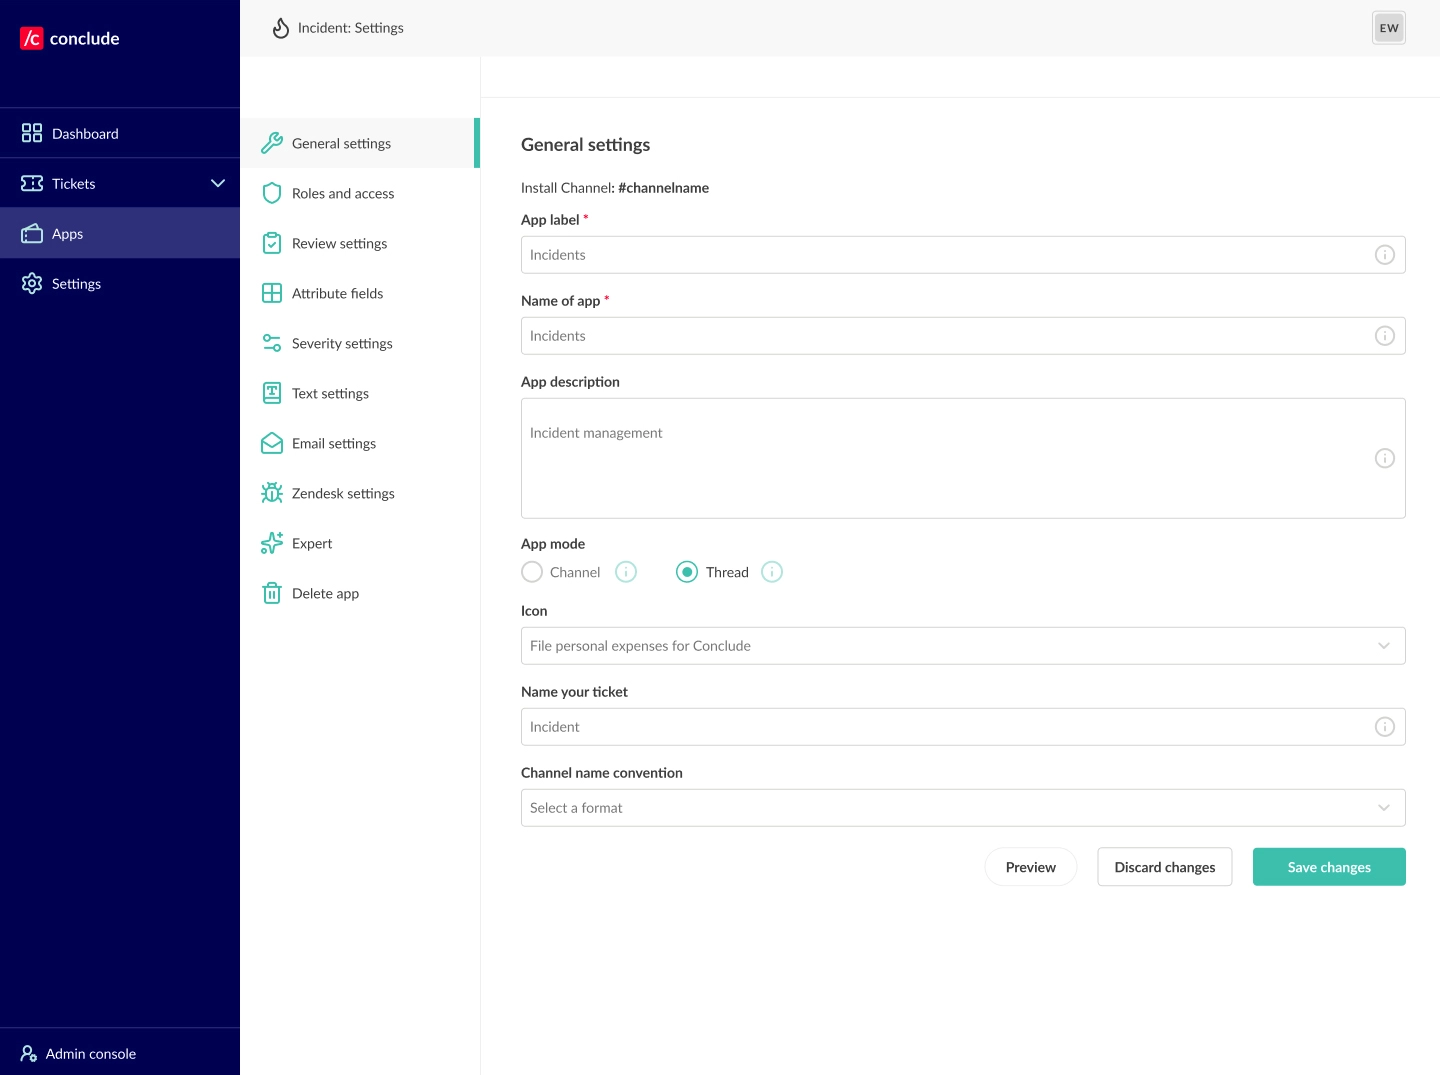 Conclude offers multiple ways to configure and define an app’s behavior.
* **General settings** – configure the app’s name, enter a short description, and determine who has access, among other things
* **Roles and access** – assign an owner, specify which people and channels will be invited, and which channels will receive notifications
* **Review settings** – decide who reviews incoming issues and set up any exclusion criteria
* **Attribute fields** – configure existing attributes or add new ones; this includes **Severity settings** – enable and configure severity levels
* **Text settings** – customize different text fields, including the **Launch** button and **Owner** label
* **Integrations** – this is where you can see and set up email settings (including summarization and email translation), and connect a [Jira project](https://conclude.io/quickstart/jira/) or [Zendesk integration](https://conclude.io/quickstart/zendesk/) – see the associated Quickstart Guides for more
* **Expert** – view or edit the YAML source code of any app
* **Delete app** – lets you permanently delete an installed app
## Step 5: Creating your first ticket
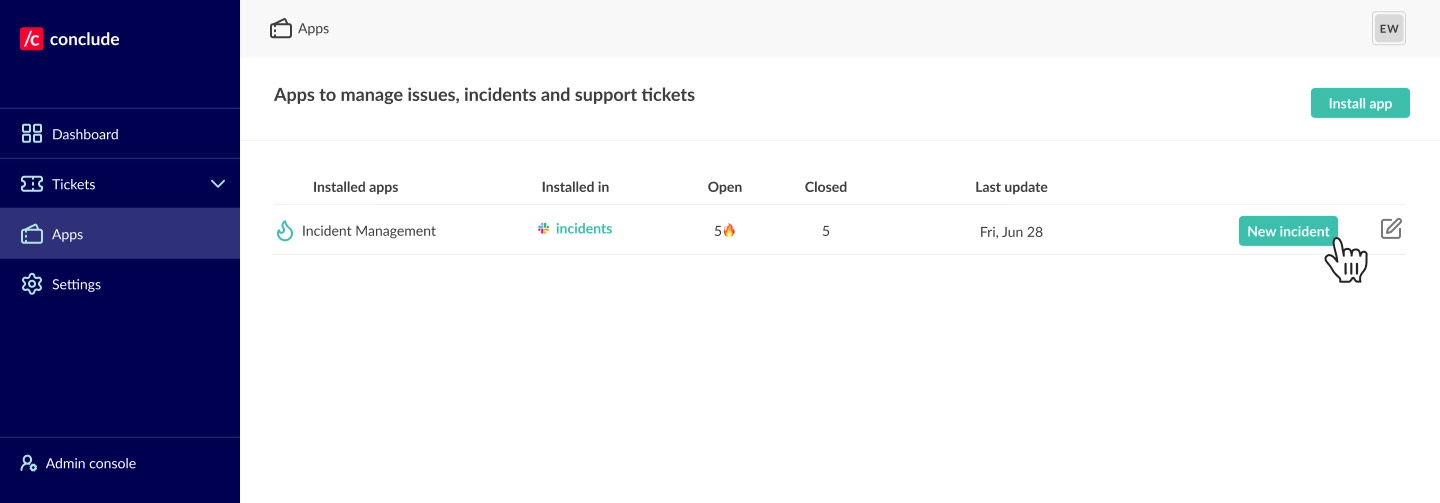
In this example, anyone who is a member of the `#incidents` channel can report an incident.
To launch an app from the web UI navigate to the **Apps** section, select the app you want to launch e.g. Incident, and click the **New incident** button.
💡 Tip: tickets can also be opened directly from Slack or Teams once Conclude is installed in that workspace. See our other Apps [Quickstart Guides](https://conclude.io/quickstart/) for more information.
Conclude offers multiple ways to configure and define an app’s behavior.
* **General settings** – configure the app’s name, enter a short description, and determine who has access, among other things
* **Roles and access** – assign an owner, specify which people and channels will be invited, and which channels will receive notifications
* **Review settings** – decide who reviews incoming issues and set up any exclusion criteria
* **Attribute fields** – configure existing attributes or add new ones; this includes **Severity settings** – enable and configure severity levels
* **Text settings** – customize different text fields, including the **Launch** button and **Owner** label
* **Integrations** – this is where you can see and set up email settings (including summarization and email translation), and connect a [Jira project](https://conclude.io/quickstart/jira/) or [Zendesk integration](https://conclude.io/quickstart/zendesk/) – see the associated Quickstart Guides for more
* **Expert** – view or edit the YAML source code of any app
* **Delete app** – lets you permanently delete an installed app
## Step 5: Creating your first ticket
In this example, anyone who is a member of the `#incidents` channel can report an incident.
To launch an app from the web UI navigate to the **Apps** section, select the app you want to launch e.g. Incident, and click the **New incident** button.
💡 Tip: tickets can also be opened directly from Slack or Teams once Conclude is installed in that workspace. See our other Apps [Quickstart Guides](https://conclude.io/quickstart/) for more information.
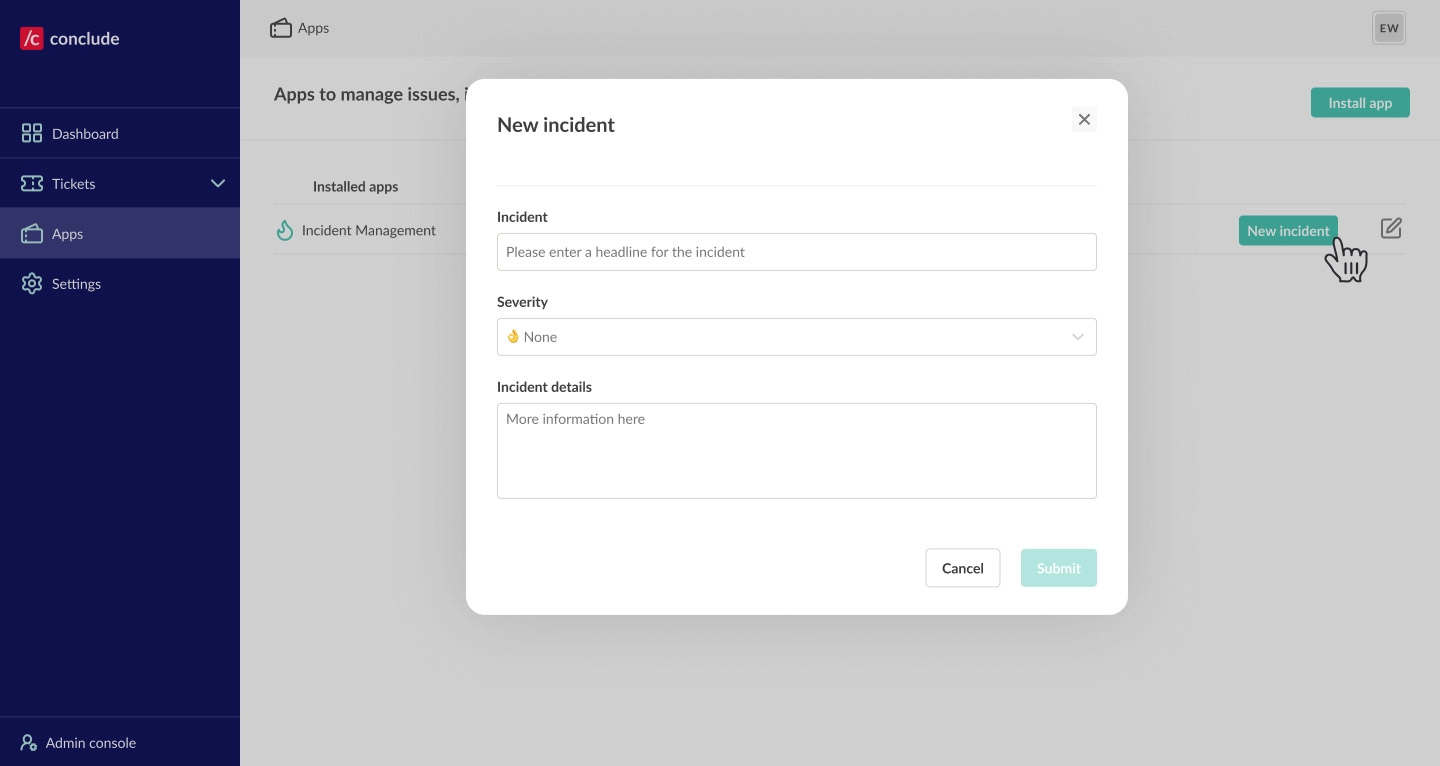
 Next, give your team more details about the incident or issue and submit the ticket (you can edit and add more details later).
 ### What happens next?
* An alert is sent to the channel e.g. \#incidents and a new activity channel `#_incidents-1` is created and branched from the primary channel
* Everyone from the \#incidents channel can see the new activity
* Other tickets get their own dedicated channels e.g. `#_incidents-2`, `#_incidents-3`, etc
#### Adding more details:
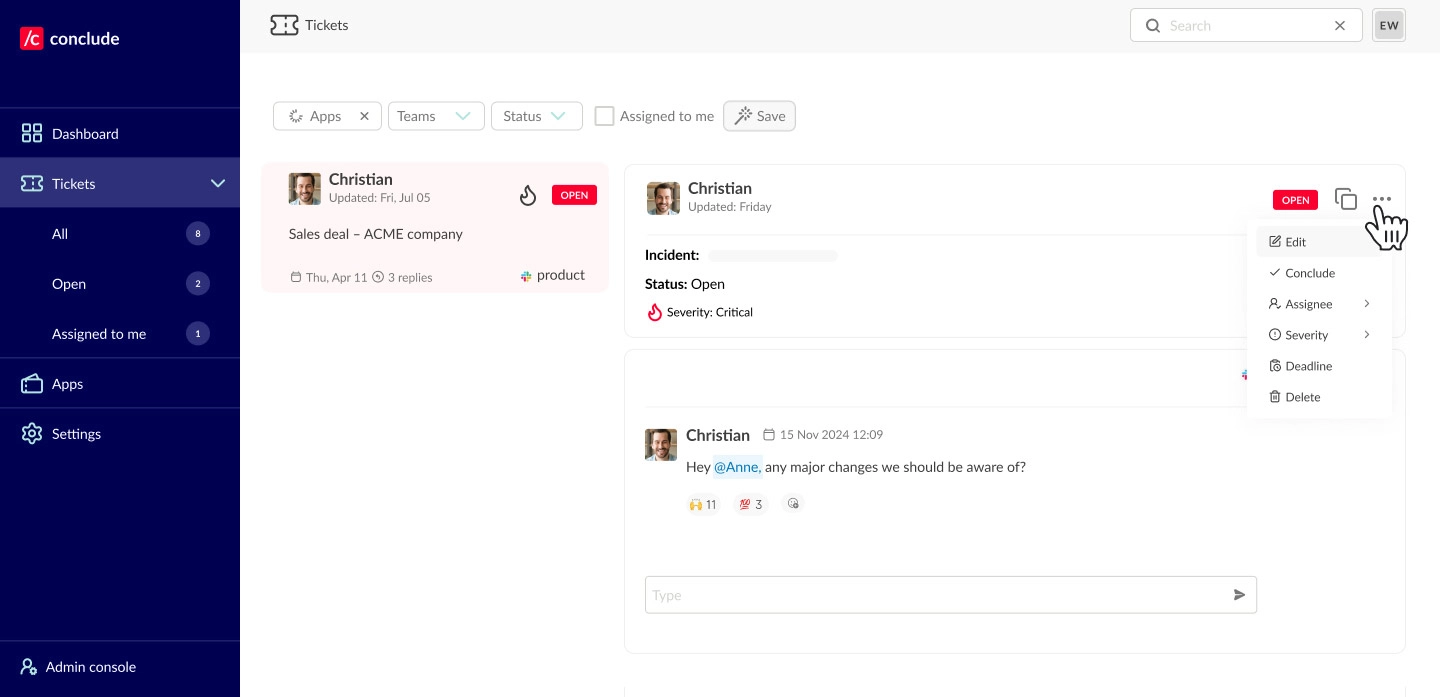
* Navigate to the open incident card – you will find all your cards under **Tickets**
* Click the three dots in the upper right-hand corner and select **Edit** to make any changes, including changing the severity level and who the incident is assigned to
### What happens next?
* An alert is sent to the channel e.g. \#incidents and a new activity channel `#_incidents-1` is created and branched from the primary channel
* Everyone from the \#incidents channel can see the new activity
* Other tickets get their own dedicated channels e.g. `#_incidents-2`, `#_incidents-3`, etc
#### Adding more details:
* Navigate to the open incident card – you will find all your cards under **Tickets**
* Click the three dots in the upper right-hand corner and select **Edit** to make any changes, including changing the severity level and who the incident is assigned to
 ## Step 6: Concluding your first ticket
After the issue is resolved, the activity can be concluded. Once closed, the ticket or dedicated channel is archived, but it remains searchable from the dashboard under **Tickets**.
### To close a ticket
* Click the three dots in the upper right-hand corner and select ✓Conclude
* Add the cause of the incident and the resolution; edit any other details if needed
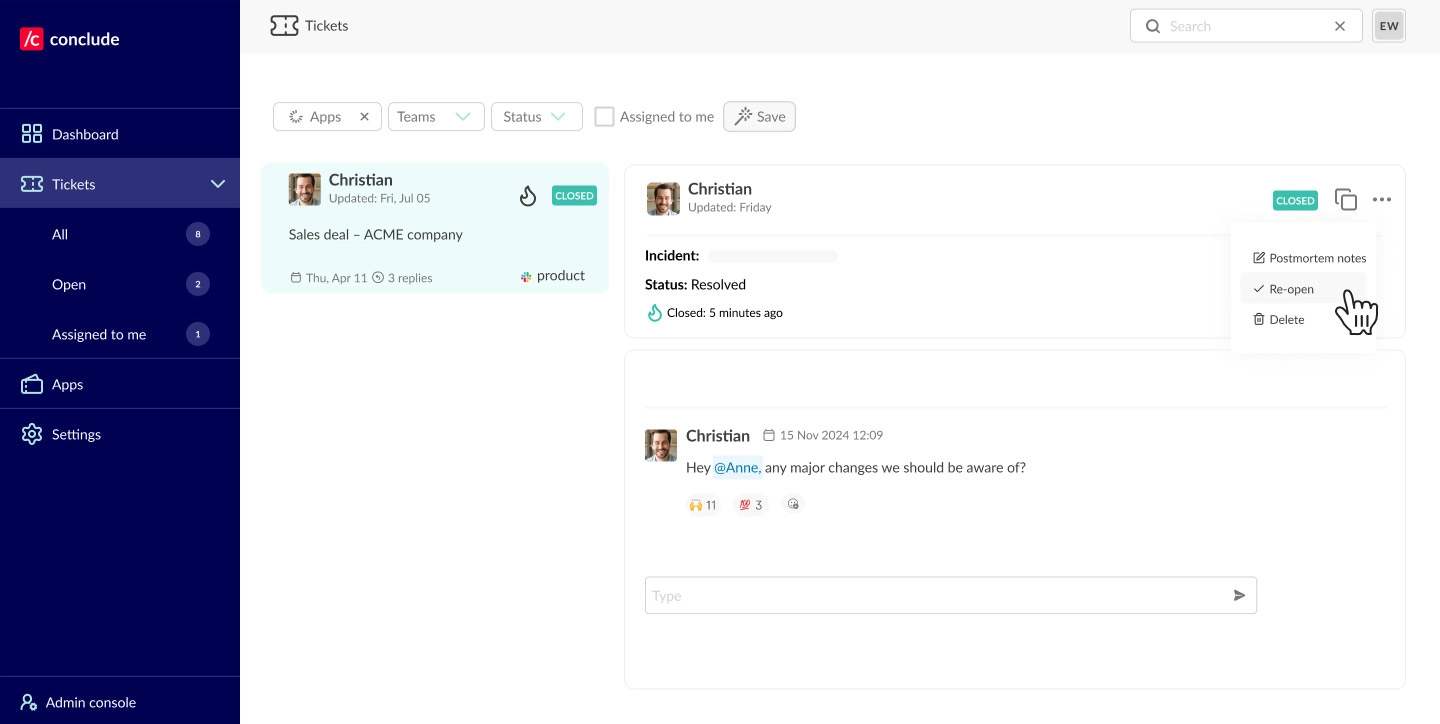
* Select **Done** to close the ticket (it will display a green “Closed” label)
* A message will be sent to the main channel e.g. `#incidents`, notifying team members that the issue has been resolved, along with any relevant details
💡 Tip: Reopen closed activities (by clicking on the three dots) then selecting **Re-open**. You can also add **Postmortem notes** from the same location.
## Step 6: Concluding your first ticket
After the issue is resolved, the activity can be concluded. Once closed, the ticket or dedicated channel is archived, but it remains searchable from the dashboard under **Tickets**.
### To close a ticket
* Click the three dots in the upper right-hand corner and select ✓Conclude
* Add the cause of the incident and the resolution; edit any other details if needed
* Select **Done** to close the ticket (it will display a green “Closed” label)
* A message will be sent to the main channel e.g. `#incidents`, notifying team members that the issue has been resolved, along with any relevant details
💡 Tip: Reopen closed activities (by clicking on the three dots) then selecting **Re-open**. You can also add **Postmortem notes** from the same location.
 ### Customizable Dashboard for all users
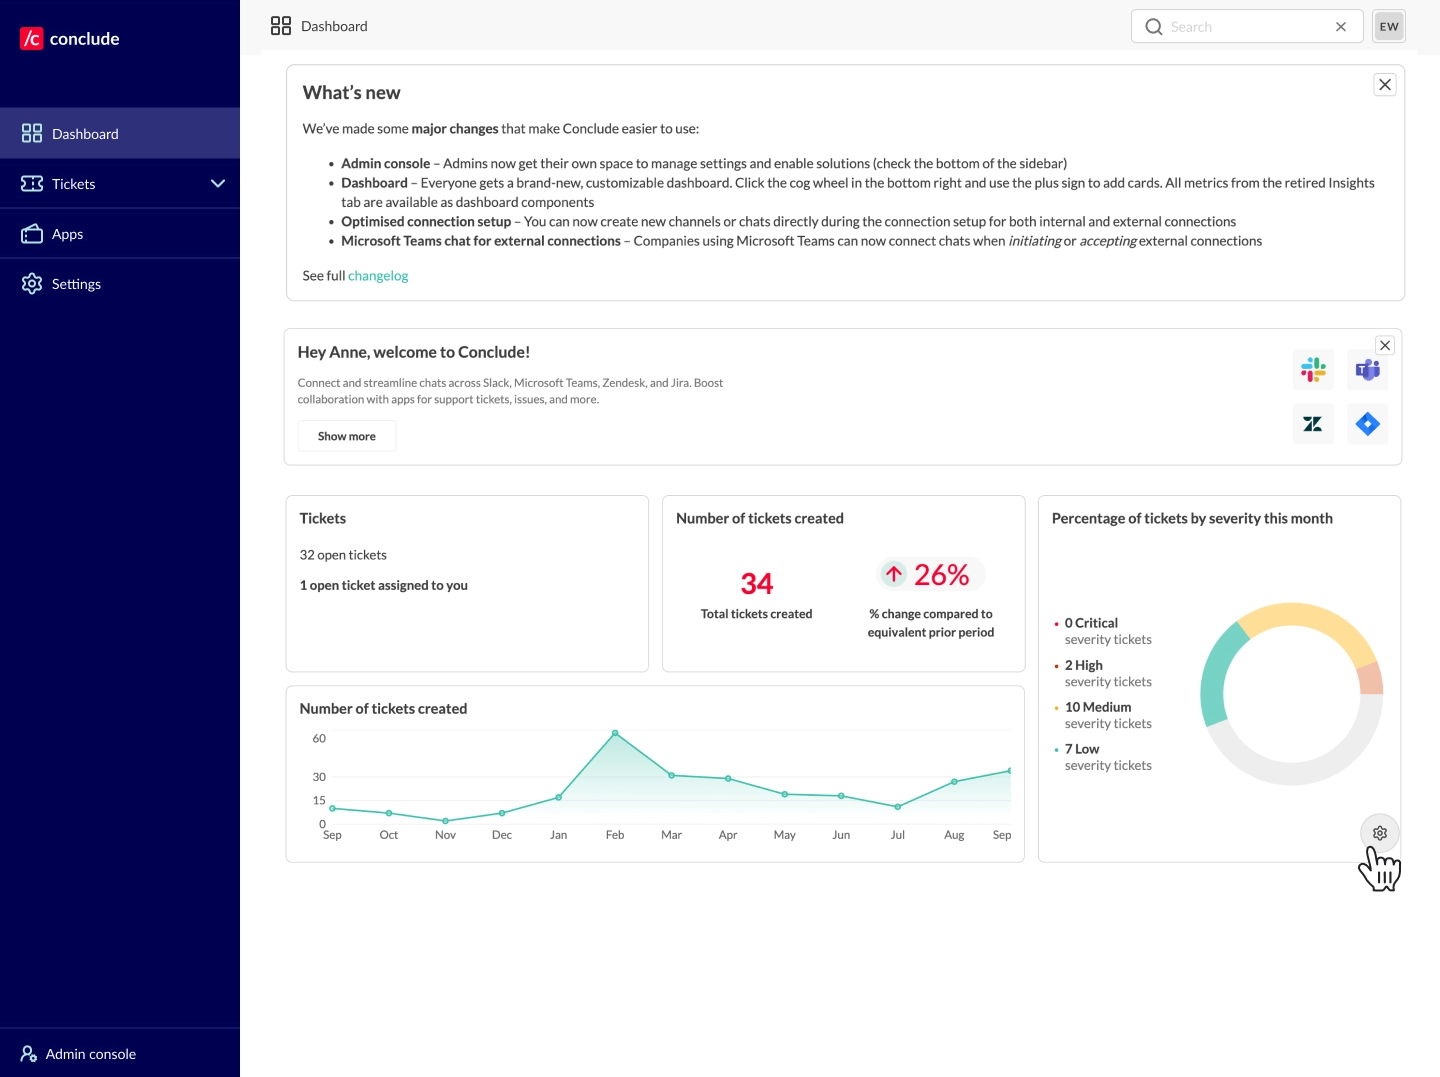
All users have access to the customizable Dashboard. Get more app insights by choosing the components you want to see, including ticket metrics.
**Click the cog in the bottom right** and use the plus sign to add cards. Each component can be dragged and resized to fit.
### Customizable Dashboard for all users
All users have access to the customizable Dashboard. Get more app insights by choosing the components you want to see, including ticket metrics.
**Click the cog in the bottom right** and use the plus sign to add cards. Each component can be dragged and resized to fit.