
How to
The app editor
On this page
The app editor is a side drawer in the Dashboard. It edits one installed app. You need the Manage apps role to use it.
Open the editor
- In the Dashboard, open Apps in the sidebar.
- Select the edit icon on the app’s row. The drawer opens on General. The tab name is part of the address.
The edit icon and the Install app button appear only for users with the Manage apps role. See Roles and permissions. Without the role, the drawer is read-only. It is also read-only while the organization is suspended.
Save, discard and close
- Save turns on when three things are true. Something has changed, the YAML is valid, and any Jira integration account email you entered is a valid address.
Ctrl+S(Cmd+Son macOS) also saves - Cancel closes the drawer. With unsaved changes it becomes Discard changes. That returns every tab to the last saved state
- Switching tabs keeps unsaved changes. If you leave the editor with unsaved changes, Conclude asks you to confirm
Install and remove an app
You install an app outside the editor.
- On the Apps page, select Install app.
- Choose a template.
- Choose the workspace, team and channel.
Templates describes the list the installer offers. The Dashboard quickstart walks through the flow.
To remove an app, select Delete app at the left of the editor footer and confirm. The button is absent when the drawer is read-only. The app is removed from its channel. If the channel is connected through Connect, app activity stops syncing across the connection. Messages the app already posted stay in Slack or Microsoft Teams.
The seven tabs
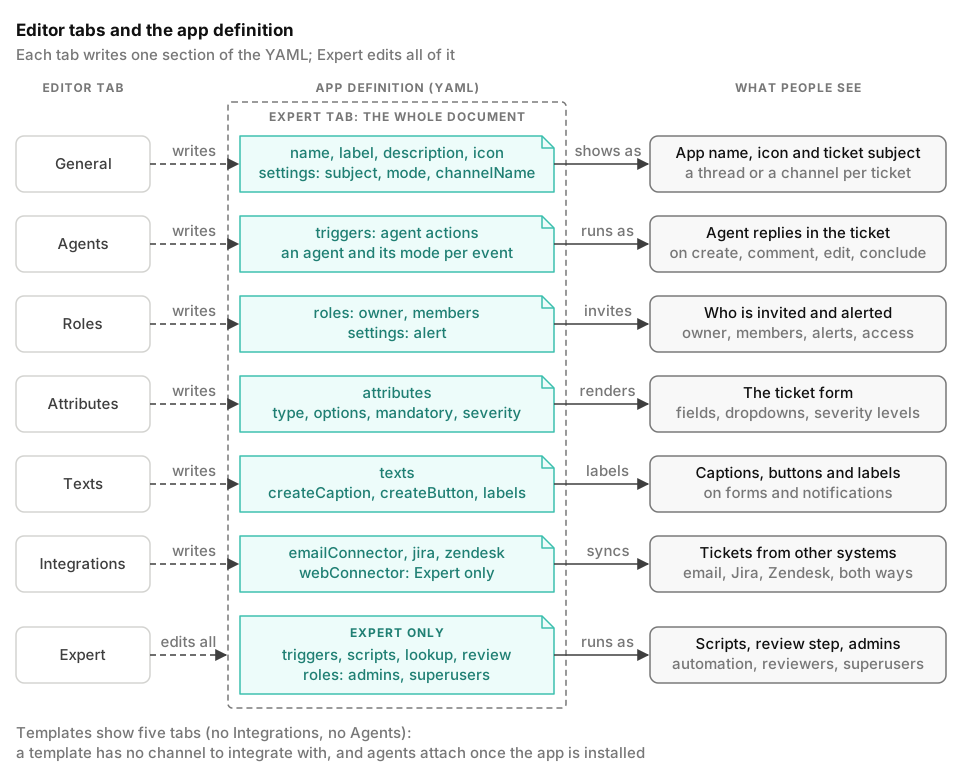
An installed app shows the tabs in this order:
- General sets the label, name, description and icon. It also decides whether each ticket becomes a thread or its own channel.
- Agents chooses which of the organization’s agents answer on the app’s tickets, on which events, and in which mode.
- Roles sets the default assignee, who is invited to new tickets, where alerts go, and who can use the app.
- Attributes holds the fields on every ticket. The severity settings are a section on this tab, not a tab of their own.
- Texts changes the labels, captions, button texts and notification intros.
- Integrations turns on email, Jira and Zendesk for this app.
- Expert shows the definition as YAML. Use it for triggers, scripting and any setting without a control.
Two tabs only appear in some cases.
- Agents is listed only when beta features are turned on for your organization. Other organizations see six tabs
- Agents and Integrations need a channel behind the app. A template is an app that is not installed yet, so it has no channel. The template editor in Admin console > Apps > Templates shows five tabs, General, Roles, Attributes, Texts and Expert. Its footer has Delete template. It leaves out Agents whether or not beta features are on
Next steps
Most people start on General. Automation covers what the Expert tab adds beyond the form tabs.