How to Create a Jira Ticket From Slack (2025 Guide)
 Sian Bennett
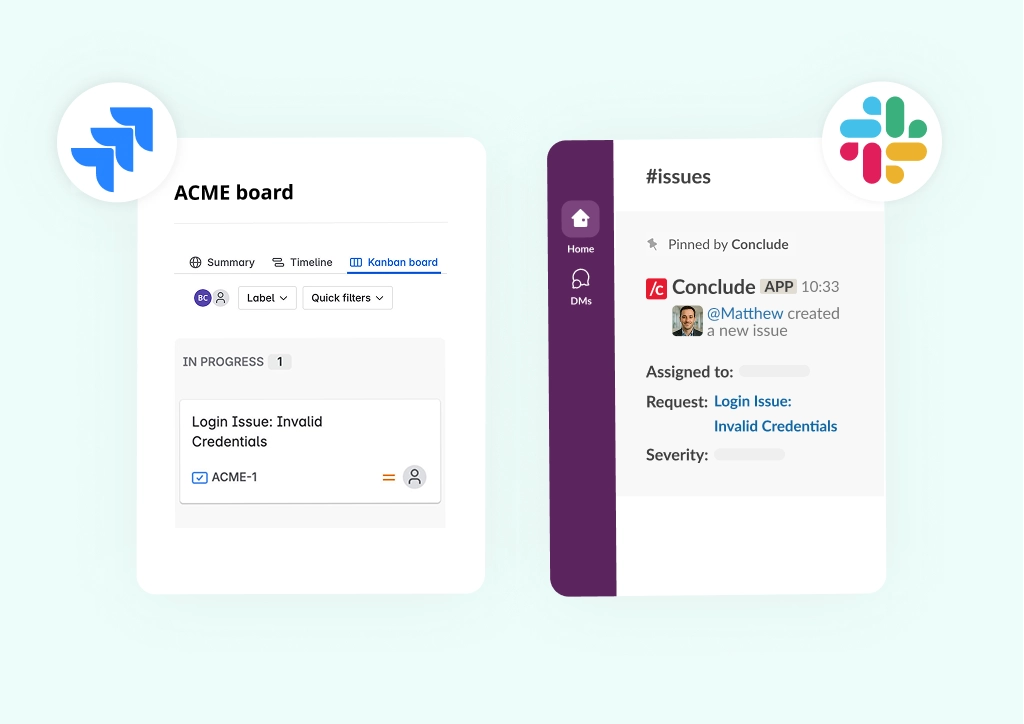
Jira helps teams track issues, manage projects, and support product development. It’s also widely used for capturing and prioritizing feature requests. But if most of your team’s conversations happen in Slack, switching between tools to log issues can slow everyone down – and important details are easily lost. That’s why being able to create a Jira ticket from Slack is so useful.
With a Slack and Jira integration, teams can stay focused. You can also create Jira tickets from Slack directly, using simple Slack Jira commands to keep everything synced in one place.
This guide explains two methods to integrate Jira with Slack to streamline ticket creation. We’ll cover one native setup option with Atlassian, and another with Conclude Apps for a complete Slack issue tracking system that’s especially useful for IT, Support, and Product teams.
Want a better way to manage Jira tickets inside Slack? Get started with Conclude Apps free for 14 days.
Why Integrate Slack and Jira?
Integrating Slack and Jira helps teams stay focused, reduce double-handling of information, and keep conversations and tickets in sync. For a lot of teams where collaboration already happens in Slack, having to switch into Jira just to log an issue or check a status update breaks your workflow.
Some of the key benefits that a Slack and Jira integration offers:
- Faster Problem Resolution: Teams can create, track, and respond to issues directly from Slack. This is especially helpful for support, bug tracking, incident management, or any time-sensitive workflows
- Real-Time Visibility: With Jira Slack notifications, everyone stays up to date without constantly checking Jira. Changes to issues, comments, or assignments appear instantly in Slack channels
- Centralized Conversations: Slack messages and Jira issues stay connected, helping reduce confusion and keeping valuable context tied to the ticket
- Cross-functional Clarity: From engineering and IT to product and operations, integrating the tools your teams already use improves collaboration and reduces silo mentality
- Fewer Distractions: Keeping ticket updates and discussion in one place means less context switching. If your team uses Slack every day, here are some practical Slack productivity tips that complement integrating Jira
- Transparent Tracking: Managers and leads can follow progress from creation to resolution, without needing to leave Slack. This makes issue tracking easier to manage across the team
- Boosted Productivity: With a solution like Conclude Apps, teams can go beyond the basics. With two-way synchronization, teams can assign, update, and track Jira issues directly from Slack
Option 1: Connect Slack and Jira Using the Jira Cloud App
One way to create Jira tickets (or issues) from Slack is by using the Jira Cloud app in Slack (by Atlassian), allowing you to create tickets, receive notifications, and manage basic Jira actions directly from Slack.
To use this setup, you’ll need:
- A Slack account with permission to install apps
- A Jira Cloud account (part of Atlassian)
Install the Jira Cloud App on Slack
The first step is to add the Jira Cloud app to your Slack workspace. This lets you create issues, receive notifications, and manage tasks directly from Slack.
Step 1: Open the App Directory in Slack
In Slack, click More (…) in the sidebar, then select Automations and then Apps. Note: in some workspaces, you may instead see a “+ Add apps” option directly in the sidebar.
Step 2: Add the Jira Cloud App to Slack
In the search bar, type “Jira Cloud.” Select the app and click Install. This will open the Slack App Directory page. (Note: if you don’t have permissions, an app manager will need to approve your request first). On the app page, click Add to Slack. When prompted, sign in with your Atlassian account to authorize the connection.
Step 3: Confirm Successful Setup
You’ll receive a message from the @Jira bot in Slack confirming the connection. Next, use /jira connect to link a Jira project to a Slack channel – speak to your Jira admin if you don’t have permission to connect to a project. Once connected, you can then use /jira create to create a Jira issue directly from Slack.

Creating a Jira Ticket Inside Slack
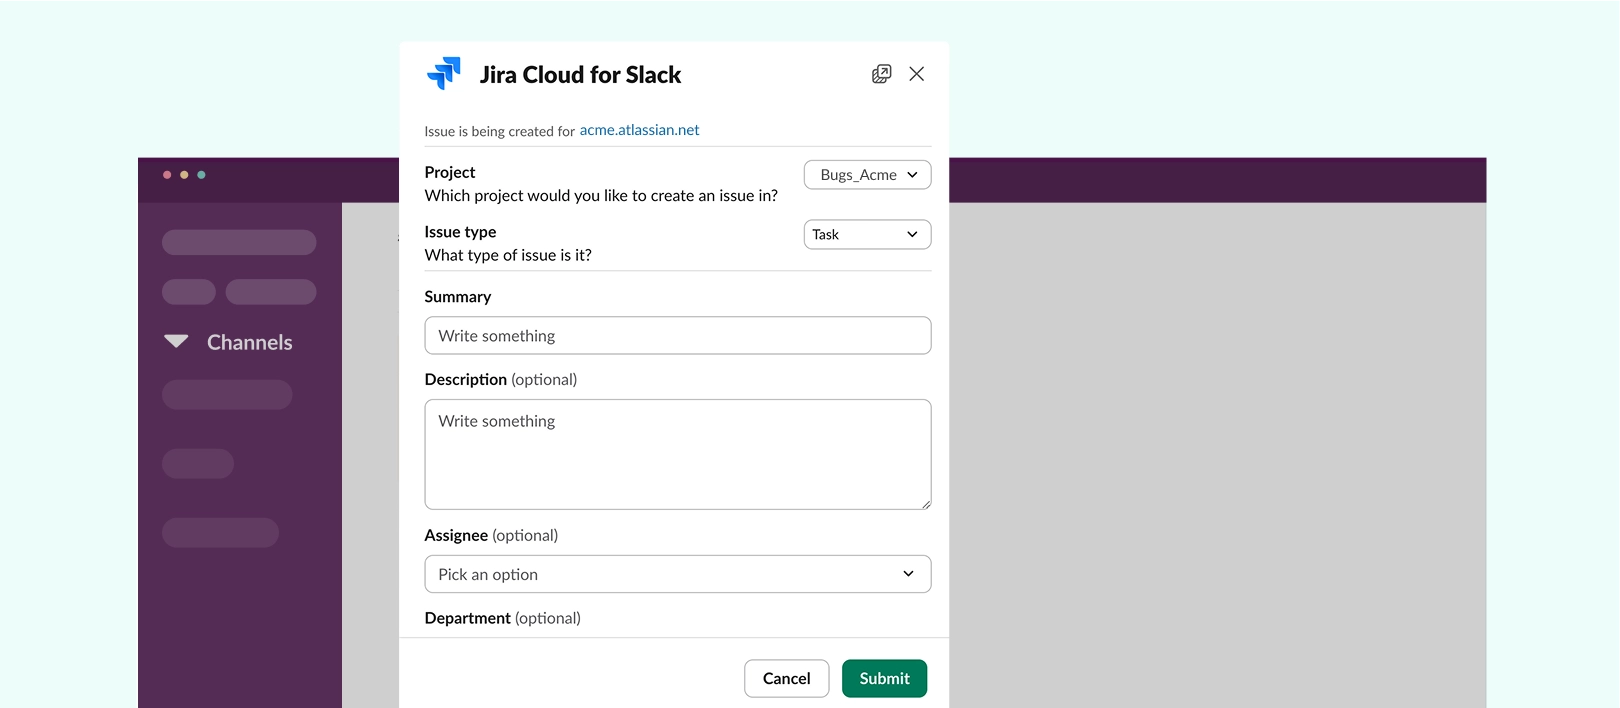
Once the integration is set up, you can create a new Jira issue directly from any connected Slack channel using the /jira create command. This brings up a form where you can enter all the relevant details for the new ticket.
Here’s how it works:
- In the relevant Slack channel, type /jira create and press enter – a pop-up window will appear, prompting you to fill in the ticket details
- From the Project dropdown, select the Jira project where you want the issue to be created
- Choose the Issue type (e.g. Bug, Task, etc.).
- In the Summary field, write a short title for the issue
- Use the Description field to provide more context or relevant information
- If needed, assign the issue by selecting the Assignee from the dropdown
- Once all fields are complete, click Create
After submitting, a message confirming the ticket creation will appear in the Slack channel, including a link to the issue in Jira.
Limitations of Native Integration
While creating Jira issues from Slack reduces the need to switch between tools, this setup comes with several limitations.
- Missing Custom Fields: The Slack issue form doesn’t display all fields configured in Jira, which means users often need to open Jira to complete or edit the ticket
- No Synced Conversations: Comments and updates made in Jira aren’t reflected back in Slack, making it harder to follow the full thread of communication
- Manual Project Selection: Users must manually choose the correct Jira project each time, increasing the risk of misrouted tickets or delays
- No Tailored Forms: You can’t create custom input forms in Slack to ensure consistent or required details are captured during ticket creation
- Lack of Built-in Workflows: There’s no way to add approval steps, triage flows, or checklists, which limits process consistency for repeatable tasks
These limitations may be manageable for small teams or one-off requests, but they can quickly become blockers for teams that rely on Slack for day-to-day issue tracking.
Option 2: Jira and Slack Ticketing Solution with Conclude Apps
If you’re looking for more flexibility and control when managing Jira issues in Slack, Conclude Apps is a powerful alternative. Unlike Atlassian’s Jira integration for Slack, it provides full synchronization, flexible workflows, and a more structured issue tracking experience – without the configuration headaches.
- Two-Way Sync With Jira Cloud: Conclude’s Jira Cloud integration lets you create, update, and track issues without leaving Slack. Any changes made in Jira – comments, status changes, or updates – automatically appear in Slack, and vice versa
- Customized to Your Team’s Workflow: Conclude’s no-code app templates can be customized to suit your team’s needs, from incident management to customer support
- Centralized Dashboard Controls: Adjust permissions, manage connections, and configure workflows directly in the Conclude web dashboard
- Built for Security and Compliance: Conclude meets strict privacy and security standards so your data stays protected at all times
Read: Slack and Jira Integration for Issue Management: Benefits, Uses and Quick Setup.
Add Conclude to Slack and Connect Jira
Getting started with Conclude’s Jira integration doesn’t take long. Once it’s set up, your team can create and manage Jira issues directly from Slack, while keeping everything in sync.
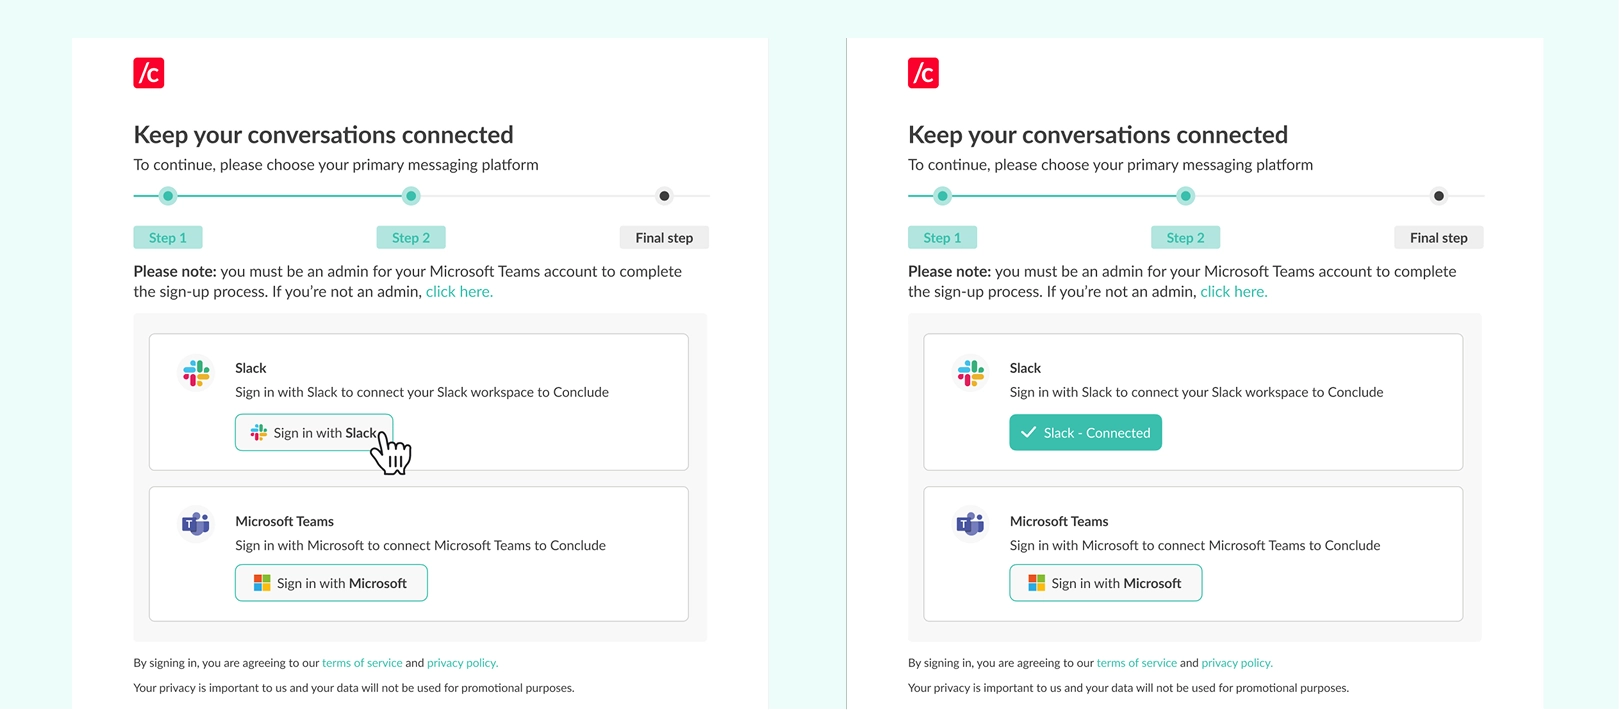
Step 1: Sign Up to Conclude and Sign In With Slack
Sign up on the Conclude website and then sign in with Slack to connect your Slack workspace to Conclude. Note: you will need admin permissions or an app manager’s approval to add Conclude to your Slack workspace.
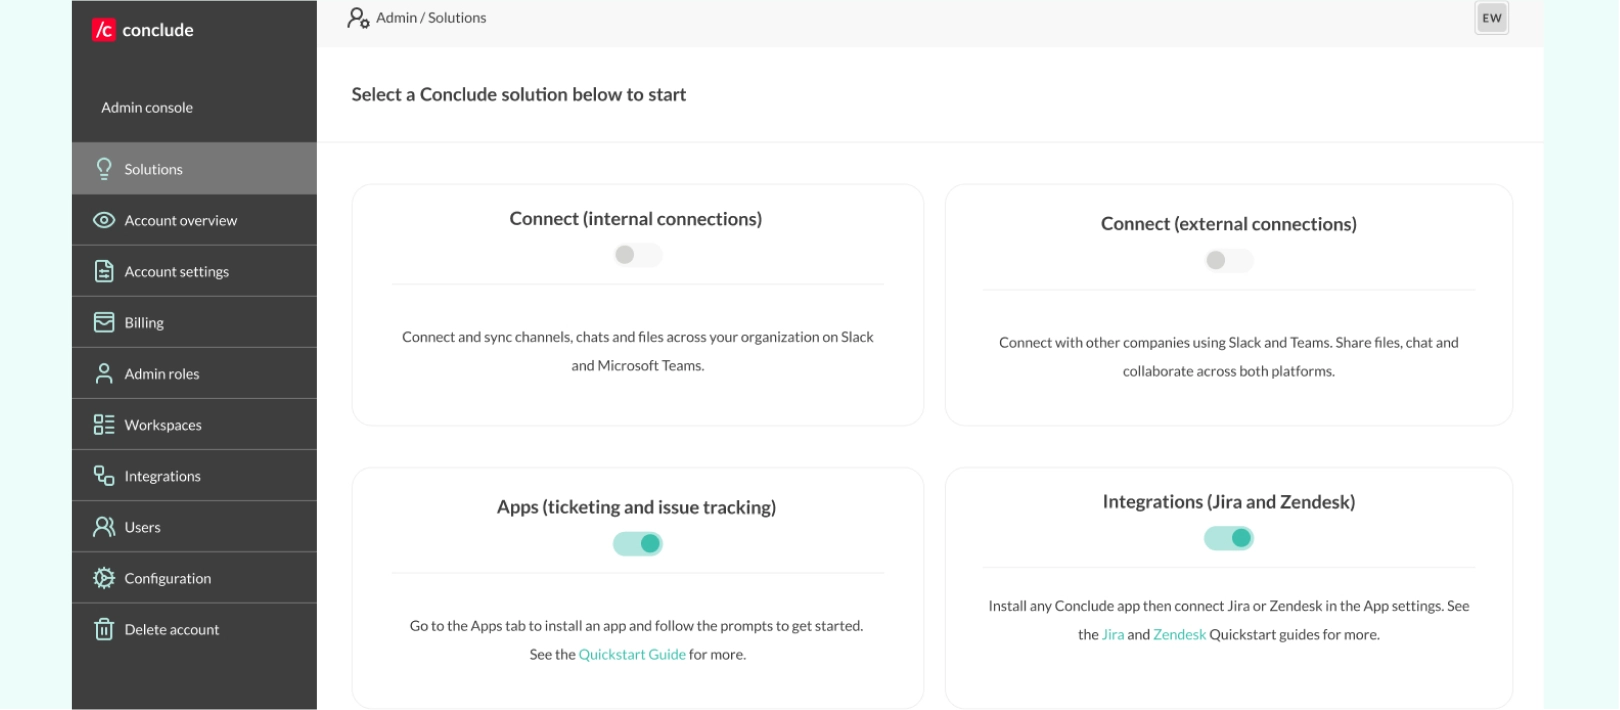
Step 2: Enable Conclude Apps and the Jira Integration
After signing up, you will be directed to the Conclude dashboard. To enable the Jira integration, you will need admin permissions to access the Admin console located at the bottom left of the sidebar and navigate to the Solutions page.
To enable Apps (ticketing and issue tracking), toggle the switch on. Next, toggle the Integrations (Jira and Zendesk) switch to the on position.
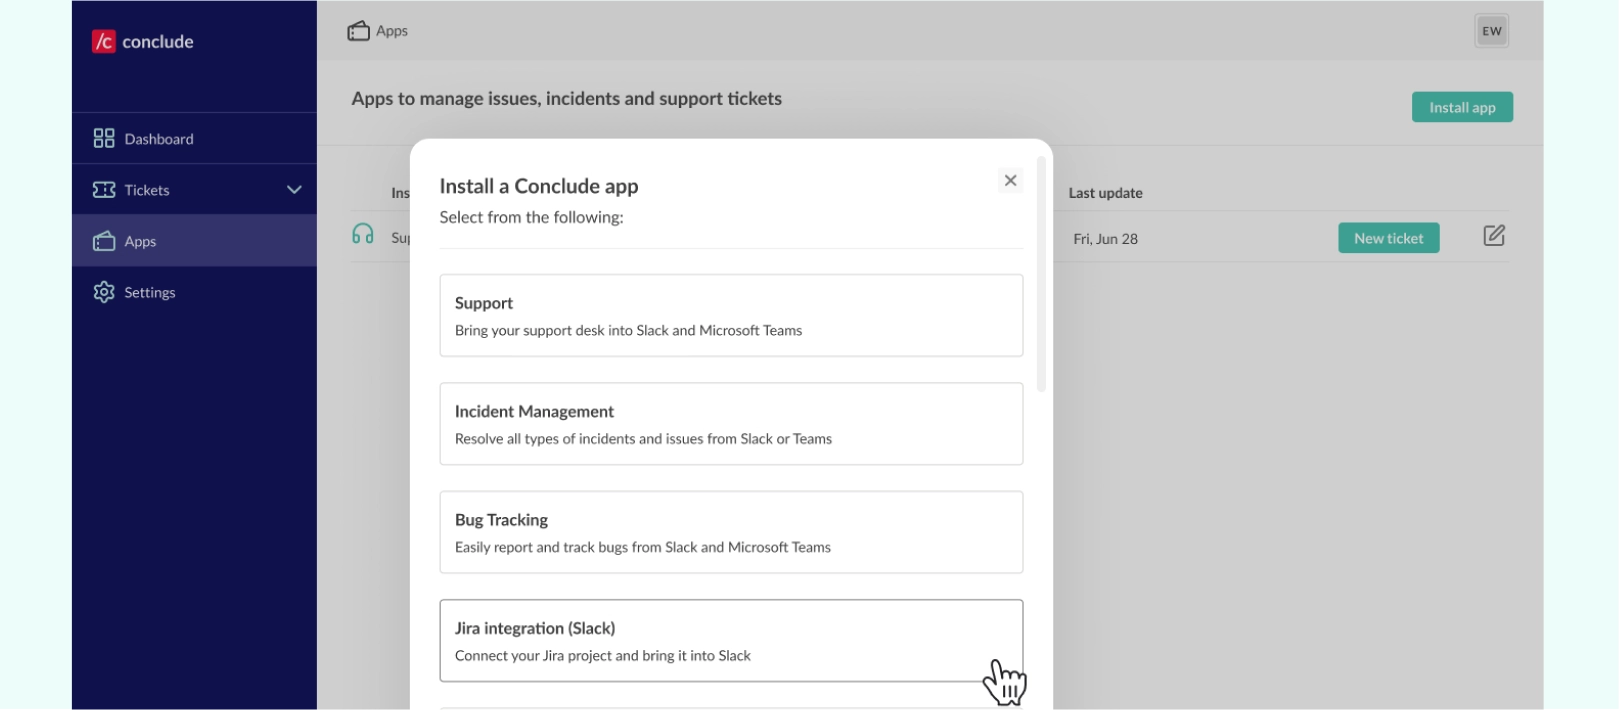
Step 3: Install an App Template from the Dashboard
Once you have enabled these solutions, a new section called Apps will appear in the sidebar. Click Back to dashboard to navigate to this section and click Install app in the upper-right corner.
You can install any app template from the web UI. Select the channel where you would like to connect Jira, e.g., #bugs or #issues.
Choose the app template best suited to your workflow, such as support, bug tracking, or Jira integration, and click Install. The app will appear once installed.
Step 4: Adjust Your Jira Settings
Go to the Apps section in the sidebar. From here, select the relevant app and click on the Edit icon (pencil icon) on the far right. Within the settings view, navigate to the Jira settings tab. This tab will only be visible when the Jira integration switch is toggled on from the web dashboard.
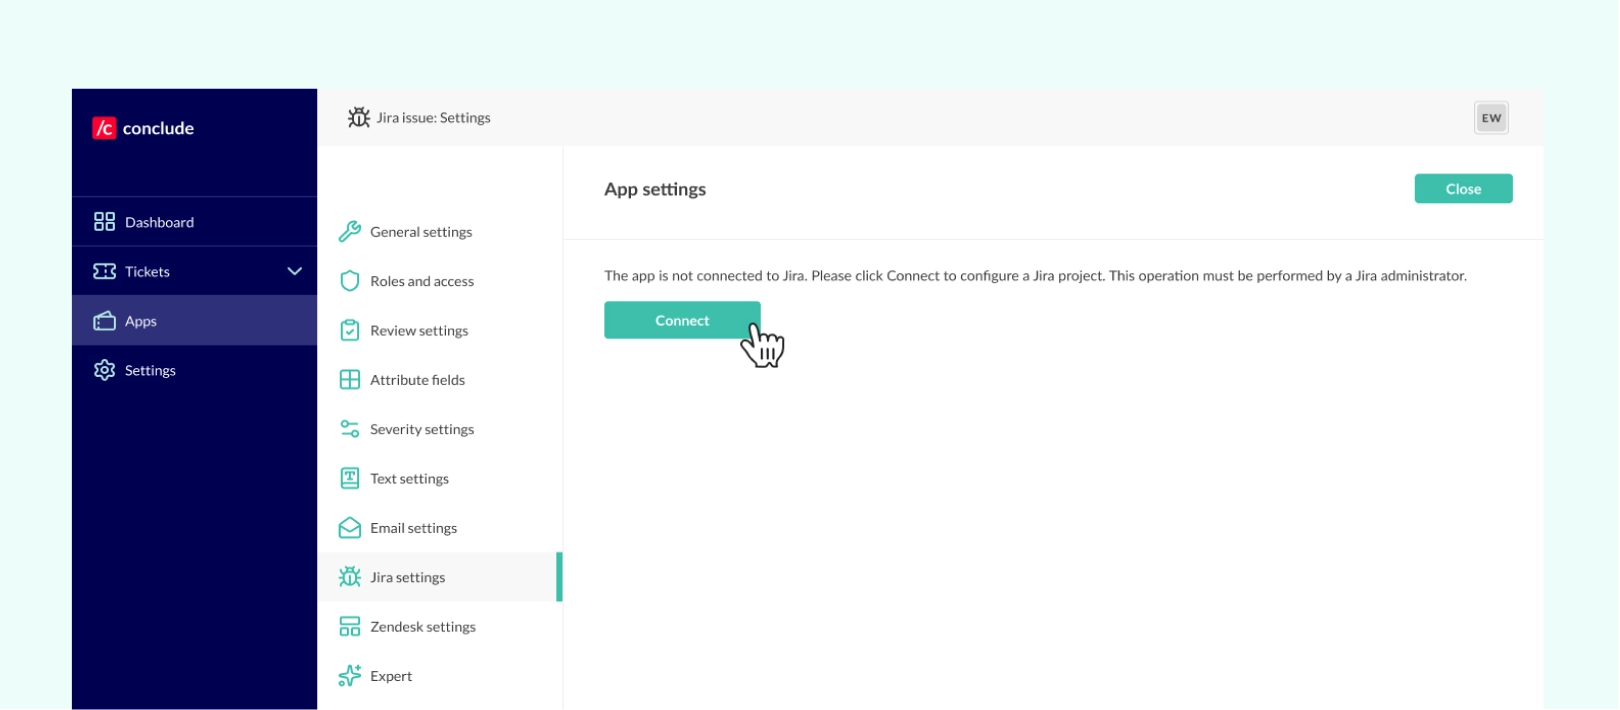
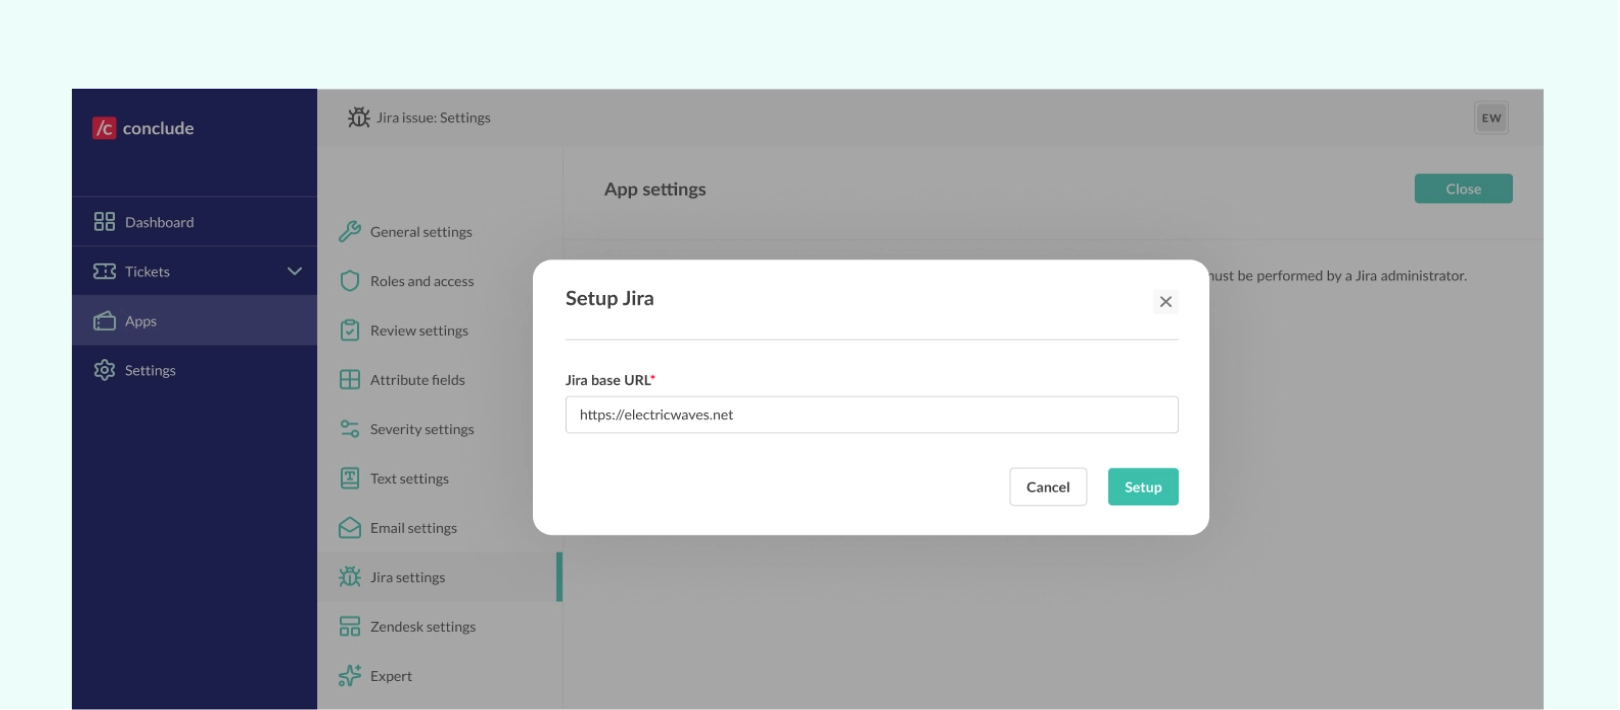
Step 5: Login to Jira and Add the Jira Base URL
After clicking Connect, you will need to add the base URL of the Jira server, for example: https://ewaves.atlassian.net and click Setup. This creates a reliable connection between Conclude and the user’s Jira Instance.
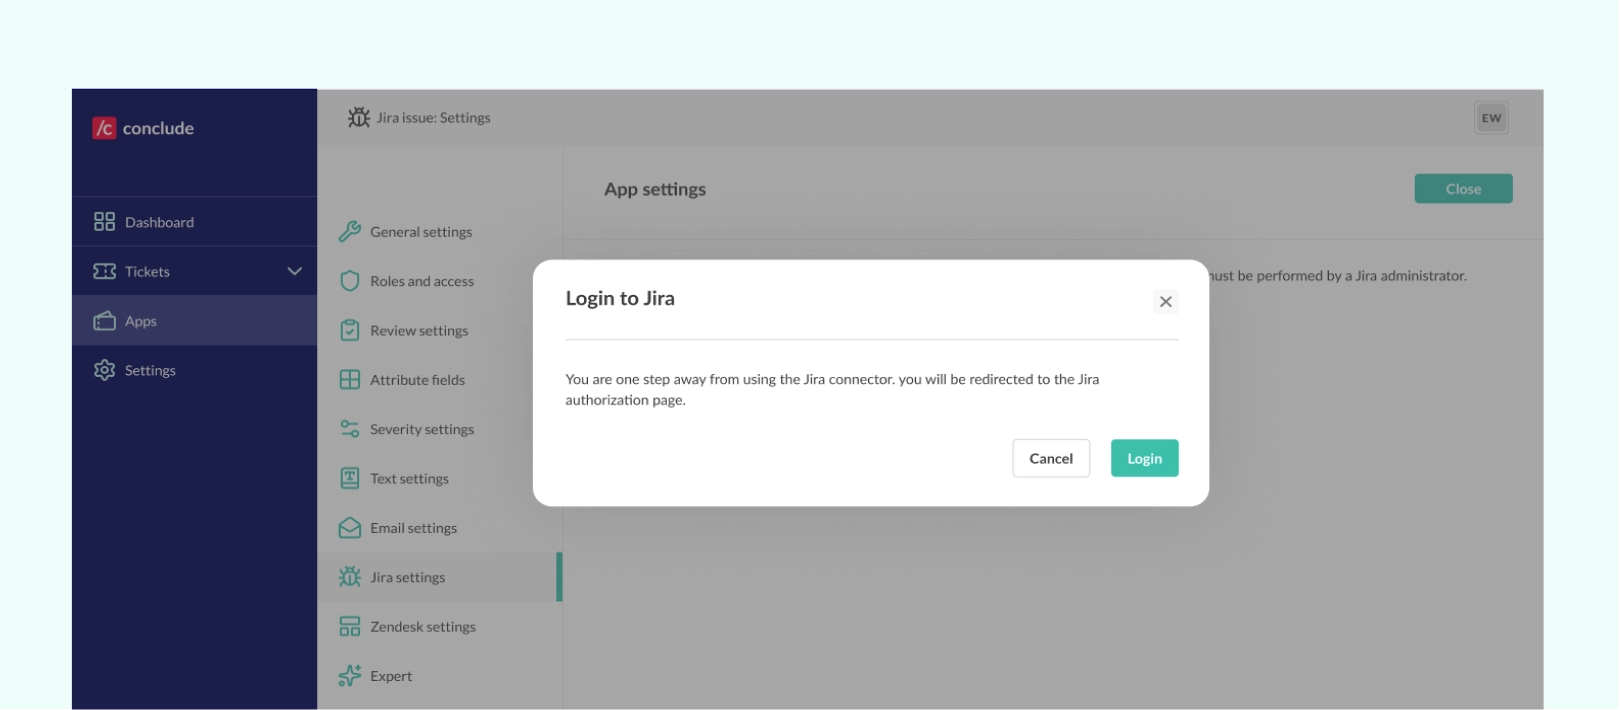
Next, you will be asked to login to Jira.
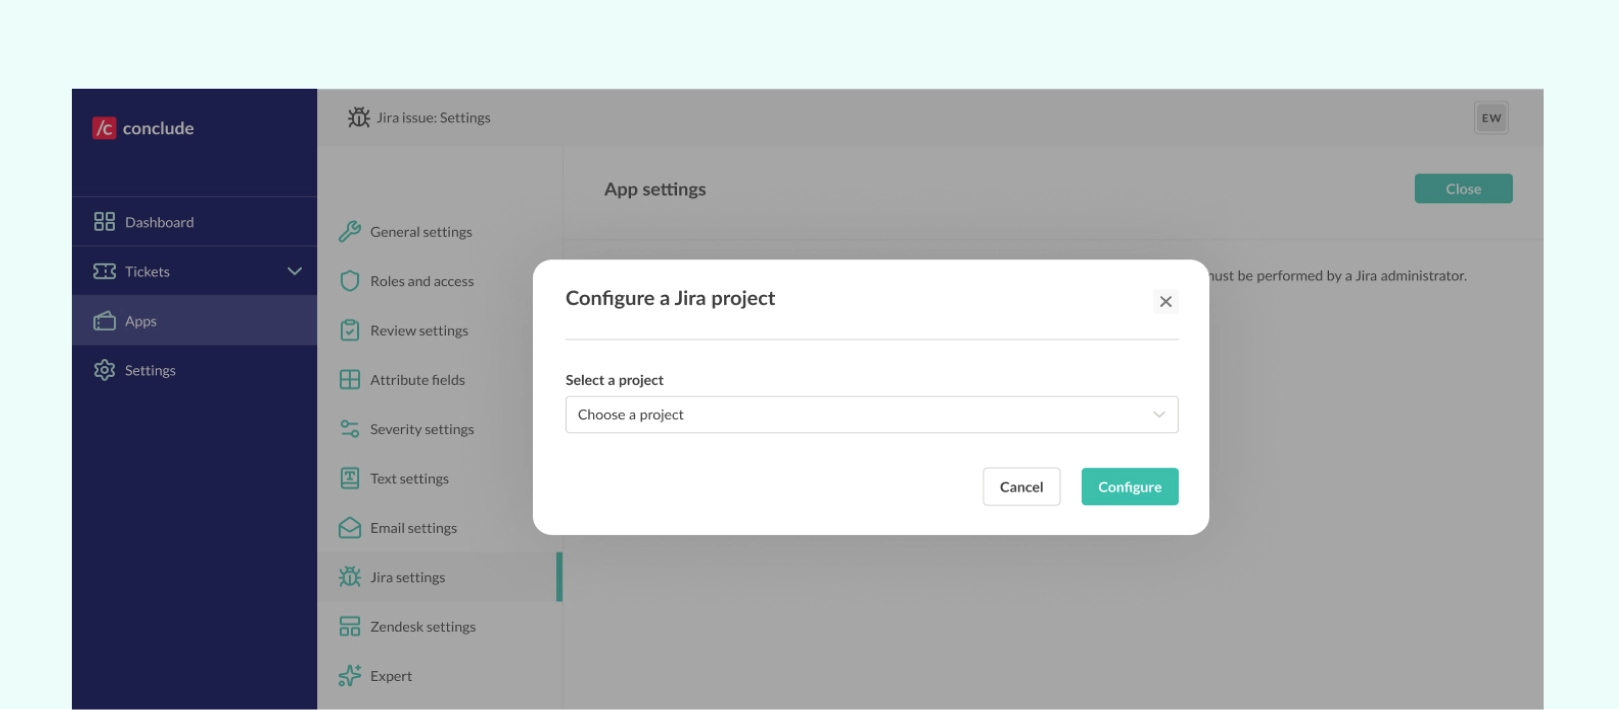
Step 6: Configure a Jira Project
After logging in, you’ll be asked to configure a Jira project. Choose the project you want to connect from the dropdown menu. Note: projects that are already configured will not be shown.
Once the project is connected, you’ll see a confirmation message. Conclude will automatically pull the project metadata and update the attributes section of the app in this Slack channel.
For more detailed steps, including tips on syncing pinned comments or mapping user accounts, see our Jira Quickstart Guide.
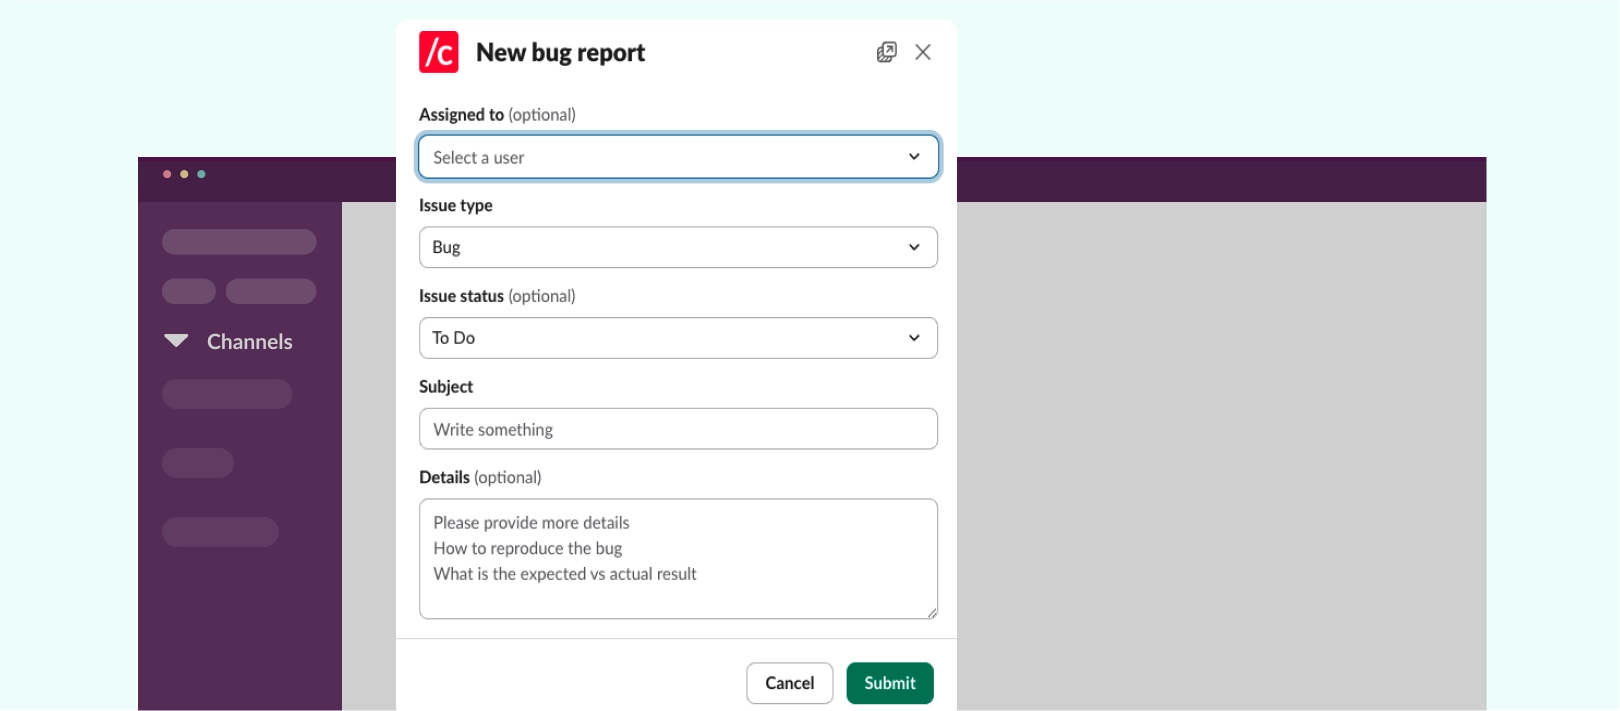
Create a Jira Ticket From Slack With a Command
Once Conclude is set up and your Slack channel is connected to a Jira project, you can start creating tickets. The ticket will be created in Slack and instantly synced to Jira and Conclude’s web dashboard, keeping everything aligned.
- Type
/c newin the Slack channel where the Conclude app is installed to launch the issue creation form - Fill in the ticket details, including assignee, severity (optional), and any other relevant fields configured for your team
- Submit the ticket to create the issue in Jira. It will also automatically sync with Conclude’s web dashboard, so everyone stays aligned on progress
- Refresh the Jira project page if the issue doesn’t appear right away. You can also use
/c jira statusto check your login or/c jira connectionsto view active links - Post comments in Slack as usual. They’ll appear under the correct user identity in Jira, keeping communication traceable across both platforms. For example, if @Susan comments on an issue in Slack, the same comment will appear in Jira under their Jira identity
A Complete Slack Issue Tracking Solution With Conclude
Creating Jira tickets directly in Slack helps teams easily track issues without losing context or switching between platforms. Whether you’re logging a bug, capturing a customer issue, or assigning a task, staying in Slack keeps everyone aligned and speeds up your response.
Conclude Apps offers an end-to-end ticketing solution that lives inside Slack. With two-way syncing, customizable templates, and secure data protection, you can manage every stage of an issue – from creation to resolution – without ever leaving your workspace.
Want a better way to manage Slack issue tracking? Try Conclude free for 14 days.
Frequently Asked Questions
Does Slack have a ticketing system?
No, Slack doesn’t include a built-in ticketing system. But you can add ticketing features through integrations. There are plenty of ticketing solutions for Slack available – see our post on the best Halp alternatives for Slack ticketing.
With Conclude Apps, you get a complete solution inside Slack, including two-way Jira sync, customizable workflows, and dashboard controls. With Atlassian’s Jira Cloud app, you can create and track basic issues inside Slack using slash commands.
Can I create a Jira ticket from Slack?
Yes, but the method depends on which integration you use. With the Jira Cloud app for Slack, you can create Jira tickets directly from Slack using the command /jira create to open a basic form for issue creation. From here, you’ll be able to fill in basic fields like ticket description, issue type, and assignee. With Conclude Apps, you can use /c new to launch a form that, once submitted, syncs instantly with Jira and Conclude’s web dashboard.
Yes. Once you integrate Slack with Jira, you can create Jira tickets directly from Slack using simple commands like /jira create. From here, you’ll be able to fill in basic fields like ticket description, issue type, and assignee.
For more advanced ticketing – including detailed forms, real-time syncing, and easy tracking – a platform like Conclude offers a more complete solution. Any ticket created in Slack is instantly synced with Jira, so your team stays aligned without extra manual work.
How do I connect Jira and Slack?
Here are two ways to connect Jira and Slack. With Atlassian’s Jira Cloud app, you can install the app in Slack and link it to your Jira Cloud account. This setup allows basic issue creation and notifications, but it’s limited to core fields and doesn’t support custom workflows. With Conclude Apps for Slack, you can connect Jira and Slack through a simple configuration process that enables two-way synchronization, customizable workflows, and a complete ticketing system inside Slack.
How does Jira work in Slack?
With Atlassian’s Jira Cloud app, you can create issues using slash commands, get notifications, and take simple actions like commenting or assigning. With Conclude Apps, the integration goes further by keeping conversations and updates fully synchronized between Slack and Jira, so comments, status changes, and assignments stay aligned across both platforms.
How to create Jira notifications in Slack?
With the Jira Cloud app, you can type /jira notify to turn on personal notifications via direct message. You can adjust these settings at any time and also manage email notifications. With Conclude Apps, notifications are automatically synchronized between Slack and Jira, with flexible options to control which updates appear in which channels, ensuring your team always has the right level of visibility.